Wednesday, August 31, 2016

Section: 30
Hours: 5

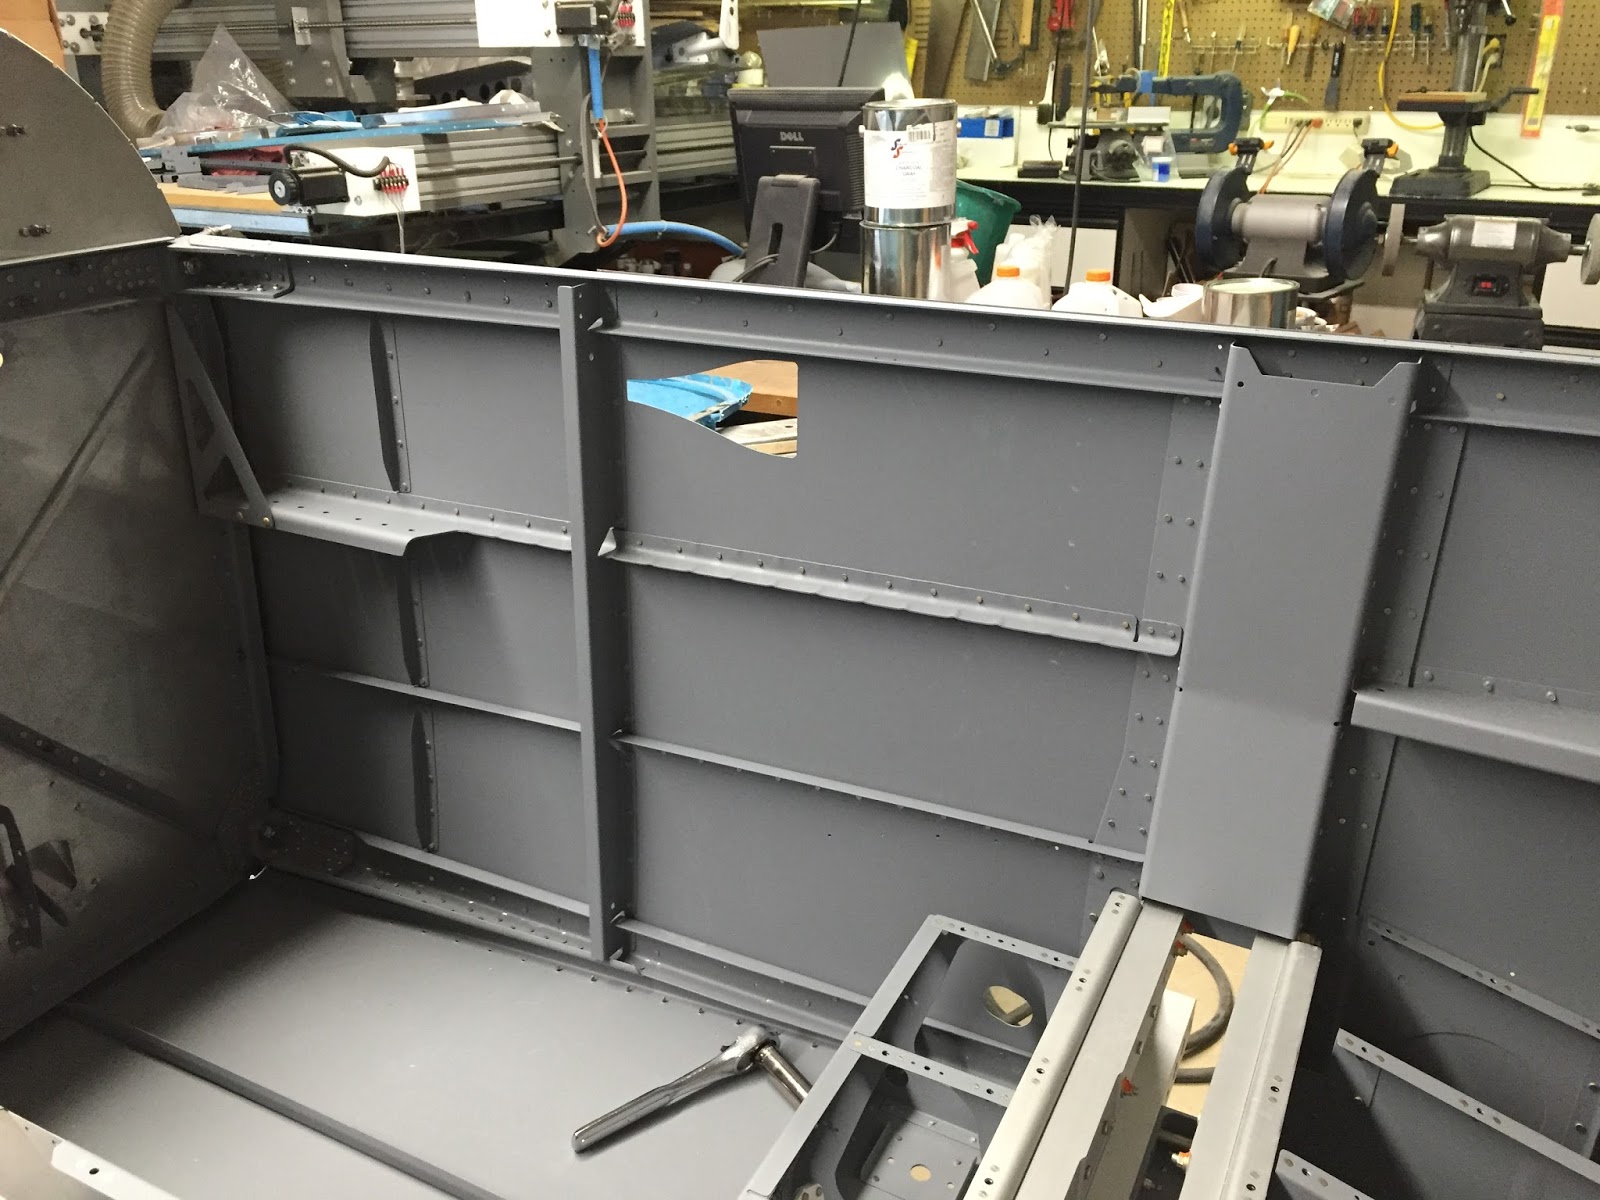
I continued riveting the tail to fuselage mating area today.

I started out riveting the baggage floor ribs to the rear bulkhead. This took awhile because it was so difficult to reach the rivets with the bucking bar and rivet gun. The manual call-out for 8 LP3-4 rivets confused me for awhile. It turns out you use the pull rivets only for the bottom hole in each of the 8 ribs. The rest of the rivets are solid (and hard to reach...).

Next I riveted the side skins to the longerons. The rivets on the bottom side of the skin overlap were a little tricky. I decided to back rivet these using my small iron bucking bar because it's face is slightly rounded and the corners are nicely radiused - perfect for fitting in under the skin overlap.

I continued back riveting for the rest of the skin rivets, but used the heavy mushroom head bucking bar.

I riveted down the vertical overlap joint as far as I could reach. The remaining rivets down the side and bottom will be a two person job.


I finished up this afternoon by installing the rest of the fuel tubing guides. I used a wedge to help set the top rivets because the pull rivet gun head just won't fit straight in because of the flange being in the way.

The guides are now installed and ready for fuel tubing.

Tuesday, August 30, 2016

Section: 30
Hours: 5

I started riveting the skins to the bulkheads today.  Several of the rivet length callouts in the drawings were a little short. I ended up using 3.5 length instead of 3's in several places and I used 5 length for all the skin to longeron rivets.


It was fun setting the row of rivets inside the tail cone that anchor the restraint lugs. I reached inside with the tungsten bucking bar and held it in place by feel while operating the rivet gun. Luckily, the shop heads turned out fine and no smilies were made today :-)

Monday, August 29, 2016

Section: 30
Hours: 4

I spent some time fitting and clecoing the bulkheads and overlapping tail and fuselage skins to make sure everything was lining up. I did a little minor edge adjustment with the duck bill pliers on the bottom skins to get them to lie flat in the corners where they all join up.

Here I've started riveting the bulkhead to the restraint lugs and tail internals.

I also started work on the fuel system. I cut and finished the fuel tubing supports / restrainers.

Here they are pop riveted to the ribs. The lugs on the outside must be set with the shop head on the fiber lug because you can't fit the rivet puller the other way around. To keep the shop head from pulling through the softer lug material you have to slide a washer over the rivet head before forming the shop head. I needed to use a wedge under the pull tool for the top rivets because of interference with the spare flange.

Sunday, August 28, 2016

Section: 30
Hours: 4

I finished prepping and primed the bulkhead and restraint lug parts.

Saturday, August 27, 2016

Section: 30
Hours: 5

Today was a red letter day- I mated the forward fuselage to the tail cone assembly!

First I had to make room in the garage, which involved moving a lot of stuff and measuring frequently with the tape measure. Woody enthusiastically helped me with the tape measure.

The technique illustrated in the manual worked out well for getting the two assemblies together with the skins overlapped properly. I had to make a quick trip over to Lowes to pick up a couple more saw horses. You start out with the tail cone tilted up, shove it in until the bottom skins mate against the baggage ribs. Then you cleco the bottom skins in a couple places in the center. Then you carefully tilt the tail cone up and make sure the skins and longerons are in the proper place. I was able to accomplish all this by myself. I got the saw horses set up the the approximate correct heights and then used wood blocks under the back of the tail cone to gradually lift it up into position.

When everything matches up, you cleco the skins to the longerons. The hardest part of the process was figuring out how to fit this in the garage and still have room for working.

Friday, August 26, 2016

Section: 29
Hours: 7

I assembled the seat back frame and attached it to the fuselage today.

I was able to squeeze all the rivets on the frame assembly which made it easy.

The manual specifies that you temporarily bolt the roll bar base before riveting the gusset to the upper longeron. That doesn't work out very for 2 of the flush rivets which fall under or right next to the base. I unbolted the base, shot the 2 rivets and then bolted it on again.

The right side went faster after figuring out the left side.  Most of these rivets are difficult to view the shop head side- I held the bucking bar and set them by feel and then inspected them with a mirror.

Here's the rivets that attach the seat brace to the bulkhead side brace.

It was a real squeeze getting the nuts on the roll bar base bolts once the intercostal was installed. I could not figure out how to get a torque wrench on these nuts so I tightened by feel, erring towards over torquing.

Here is the seat back brace installed!

Thursday, August 25, 2016

Section: 29
Hours: 5

I primed the seat back brace parts and started prepping parts for section 30.

Wednesday, August 24, 2016

Section: 29
Hours: 4

I prepped the seat back brace and adjustment guides.

The pictures of the intercostal in the manual are a real Esher drawing- hard to tell which way is down in the 3d drawing. Here is a picture of how it fits together.

Tuesday, August 23, 2016

Section: 29
Hours:  7

I attached the root fairing attach angles to the right side of the fuselage today and it went a lot better than yesterday. I corrected the dimpling on the upper rear angle and did not install the front nut plate on the upper front angle. As a result, all the riveting went much smoother.

Here is the upper forward angle riveted on without the forward nut plate installed yet. It was much easier to reach the rivets without the nut plate in the way.

Here I've attached the nut plate after riveting to the side skin.

It was tough to rivet the forward rivet of the nut plate at the front of the upper rear angle.

I used an indirect riveting method to set the last rivet on the nut plate. I put my trusty titanium bucking bar on top of the rivet and held my small titanium bucking bar under the rivet and hit the upper bar with the rivet gun. Worked great!

The two CCR264SS-3-2 rivets in the upper corners of the flap block cutout seem somewhat flimsy and were hard to set flush using my pull rivet tool.

The rear two rivets on the upper angle are flush rivets. It really helped today that I had dimpled the angle in the correct direction before attaching it to the fuselage.

Monday, August 22, 2016

Section: 29
Hours: 8

Deb helped me set the rivets that join the side skin to the bottom forward skin.

Then I riveted in the web stiffeners.

Looking ahead, the fuel system for the RV-14 runs in from the wing roots directly under your knees and then up through the center tunnel to the firewall. I started thinking about having pressurized fuel lines running through the cabin and decided it would be worth while to invest in a well manufactured set of fuel lines. Aircraft Specialty has a retro fit fuel system available for the RV-14 that includes CNC bent lines with heavier 5052 aluminum and a flex braided line from the fuel pump to the firewall. The flex line should handle vibration and impact in case of a bad landing much better than the solid tubing provided by Van's. I ordered this kit and it was delivered today, only 4 days after ordering! The box that arrived was much smaller than I was expecting, but the tubing runs are not that long. Everything looks well fabricated.

I spent all afternoon attaching the wing root faring attach angles.  It took much longer than I expected because I had dimpled several holes forward the back of the top rear angle the wrong direction and didn't discover the error until I had already shot a bunch of rivets in it. I had to drill them all out and correct the dimpling and then do it over again. I also had a lot of problems setting a rivet in the upper forward attach angle because the nut plate made access to the rivet impossible. After two tries I gave up and removed the nut plate, easily set the rivet into the fuselage side and then reinstalled the nut plate. Live and learn...

Saturday, August 20, 2016

Section: 29
Hours: 7

I made good progress on the fuselage today. I installed the forward bulkheads/stiffeners, the center section stiffener, the arm rest and the flap block bracket. Again, I did a lot of back riveting but there were some pull rivets and other types- a variety.


You bend the center section stiffener by lining up the relief cuts on the edge of the bench and then apply gentile force with your hands to form the slight crease.

Pull rivets are used since you can't reach the inside of the stiffener. It was difficult getting the pull rivet puller on the top rivet- not much clearance available. I found it helped to first insert the rivet and then slide the pull tool onto the rivet tail for this one.

The rear section of the arm rest is too wide for the back rivet set to reach so I used the mushroom set on the outside and a bucking bar for those. I was able to back rivet the forward section. In looking at the finished rivets, I don't think there is much difference in the finish provided by either method.

I had to slightly enlarge the top and bottom notches in the F-01402 side frames to get them to fit. Also, my kit came with 2 left frames- I called Vans and they shipped out a right frame and I got it within a couple days- great service!

I finished up today installing the flap block brackets. Before I installed the brackets I had to install the 6 small AN470AD3-3 round head rivets around the square opening. It hadn't been clear when those were supposed to be installed, but it became obvious I would not be able to rivet them once the bracket was installed.

I now put a piece of rivet tape over each round head rivet to protect the manufactured head while riveting.

Friday, August 19, 2016

Section: 29
Hours: 7

I prepped and primed the next batch of parts for the fuselage.

Thursday, August 18, 2016

Section: 29
Hours: 8

I put in a full day and completed most of the rivets from the center section forward on both sides.


I started out by mixing up another batch of ProSeal to seal the forward edges of the side skins to the firewall and the upper longeron front section.


I was able to back rivet all of the upper longeron using the back riveting bucking bar.

The lower longeron gets both cherry max pull rivets and AN426AD4's. The drawing for the rivet layout specified 7 length rivets, but when I measured them they were too short. I ended up using 8's

I finished up the day squeezing rivets into the hinge line on the firewall. This was the easiest riveting job of the day!

Here's the various rivets and tools I used today. Lots of variety!