Section: avionics
Hours: 4
Today I finished up some wiring projects. First up was adding the connector cable to the roll servo in the wing.
I discovered the hole in the servo bracket that the connector mounts in was too small. Luckily I was able to reach in with the Dremel and enlarge the hole.
The db connector attaches to the back of the servo and the other connector goes through the servo mounting bracket and then plugs into the wiring harness from the wing.
I also finished up mounting the GMU22 magnetometer in the wing. I used the mounting kit that came with my panel from SteinAir. This kit fits into the ADAHRS mounting plate which inserts into rails built into the wing.
Section: 41
Hours: 1
I had previously prepped and primed the wing/fuselage intersection panels. The panel that wraps around the leading edge must be bent to match the curvature of the wing. I found some PVC pipe of the proper diameter, chucked it up in my vise and easily applied the specified radius bend.
Disclaimer: This blog is to provide others insight into my experience and for my own historical purposes. Airplane construction is a serious affair. I have no authoritative skills relating to airplane construction. As such, any use of the information contained on this blog is at your own risk.
Saturday, November 30, 2019
Friday, November 29, 2019
Section: 38
Hours: 6
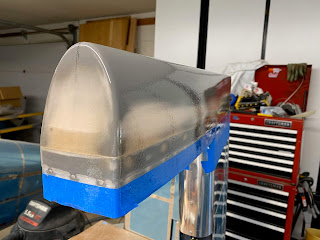
The epoxy has cured so I sanded the skin coat on the canopy.
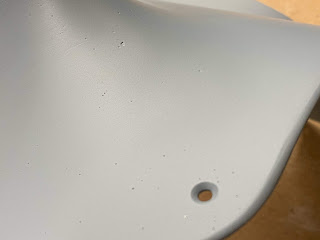
I had also skin coated the empennage fairing. Today I sanded it down and applied primer.
Unfortunately, it looks like the skin coat I applied with the foam roller brush did not fully penetrate all the pin holes. This part did not have a gel coat and had lots of pin holes. I will have to sand off the primer and reapply epoxy using a squeegee. Here's a good writeup on SkimCoating.
Pinholes - gaaack!!!!
Wednesday, November 27, 2019
Section: 38
Hours: 7
I sanded down the micro balloons and then applied an epoxy skin coat using the foam roller brush.
Hours: 7
I sanded down the micro balloons and then applied an epoxy skin coat using the foam roller brush.
Tuesday, November 26, 2019
Section: 38
Hours: 8
Today I sanded the fiberglass and carefully feathered the edges. I was careful not to sand through to the plexiglass.
Then I applied epoxy/micro balloons to fill the pinholes, rivet indentations and to blend the edge of the fiberglass into the aluminum.
It was another cold day. I've been use a propane space heater to warm up the garage so the epoxy will cure.
Monday, November 25, 2019
Section: 38
Hours: 6
I was not happy with the way the fiberglass around the canopy turned out. I had sanded through to the plexiglass in several places so I was worried about the fiberglass skirt being strong enough in those areas. Also, the fiberglass I had applied looked too translucent when seen from inside the cockpit.
Today I applied a couple more layers of glass with darkly pigmented epoxy. These should cover the areas I sanded through to the Plexiglas and add additional color.
Tuesday, November 19, 2019
Sunday, November 17, 2019
Section: ruder, elevator, horizontal stabilizer
Hours: 8
Lots of sanding today. I spent most of the day knocking down the skin coat on the rudder and horizontal stabilizer. I quit sanding early enough that I had time to apply a coat of sanding primer before quitting time. I'm not sure what paint system I will use for finishing the airplane, so I just applied a generic sanding sealer I purchased at the local auto parts shop. The goal is to seal the parts and protect them from UV until I can get the airplane to the paint shop. If the paint shop needs a different primer, this can be easily sanded off and a different one applied later.
Here's the freshly primed parts.
Saturday, November 16, 2019
Section: rudder, elevator, horizontal stabilizer
Hours: 6
Today I did a little more sanding and then applied an epoxy skin coat to seal the micro balloons and fill any remaining pores in the gel coat. I used a small foam roller brush to work the epoxy into all the holes and evenly coat the tips. I purchased the roller brush and several packages of rollers at my neighborhood Lowes. I dispose the roller after use.
Here's the parts with the skin coat of epoxy applied. The skin coat has a texture from the roller. When I sand these parts tomorrow, I will know I've gone far enough when the texture just disappears.
Friday, November 15, 2019
Section: rudder, elevator, horizontal stabilizer
Hours: 8
Here I am starting a long day of sanding.
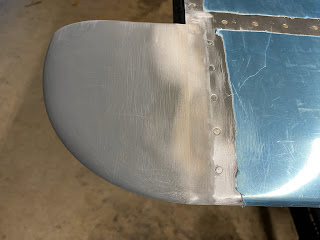
I sand the micro balloons smooth leaving a nice feathered edge blending into the fiberglass tip. The micro fills in any indentations or surface imperfections and hides the extra thickness of the fiberglass tape over the seam.
As usual, Woody kept a watchful eye on the sanding today.
Thursday, November 14, 2019
Section: rudder, elevator, horizontal stabilizer
Hours: 6
I sanded smooth the resin top coat on the fiberglass. I then applied a generous coat of epoxy/micro balloons to fair the fiberglass tape into the fiberglass tips. I also applied epoxy/micro to other areas of the tips to fill in holes and fair the surfaces. It is cold in the garage, so I brought all the parts into the warm house to ensure a good cure overnight.
Tuesday, November 12, 2019
Section: avionics
Hours: 8
The wiring harness arrived from SteinAir! It includes a new plug for the cooling fan and a short length of wiring from the old plug to the new one. Looks good.
I moved the sim card from the old connector to the new one and plugged it in. Then I installed the new harness and put the panel back together again. I'm getting faster at reassembling the panel, but it still took all day :-(
Success!!! The GTN fan now runs. Hopefully my panel wiring woes are behind me.
Wednesday, November 6, 2019
Monday, November 4, 2019
Section: elevator
Hours: 4
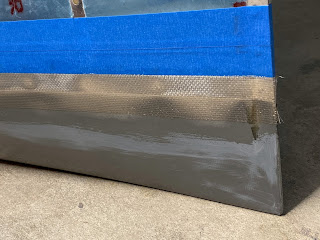
I sanded down the micro balloons I applied to the elevator yesterday and then added a strip of glass tape over the seam. I paint epoxy onto the parts and then carefully lay the fiberglass tape on the wetted area, butting the edge of the tape up to the tape line. I then dab extra resin with the brush on any area that hasn't fully wet out. Finally I cover the whole layup with strips of paper towel and press them into the fiberglass to absorb excess resin and ensure there are no air bubbles under the tape. This leaves a fairly dry layup and ensures there is not excess resin under the fiberglass.
Sunday, November 3, 2019
Section: rudder, elevator
Hours: 6
SteinAir has been difficult to reach and slow to respond to my problem with the P1001 plug. I guess they have too much work and "special projects" going on :-(
While I am waiting for them, I decided to work on fiberglass finishing. I started with the rudder tips. I want to have smooth joins between the aluminum and fiberglass tip caps. The first step was to fill the intersection gap /seam and pull rivets with epoxy/micro ballon mix. After curing, I sanded the micro balloons down and then laid up a single layer of fiberglass tape over the seam. The fiberglass strip will prevent the joint from cracking later on as the airplane ages.
I also added filled the seam and pull rivets on the elevators.
Subscribe to:
Posts (Atom)


