Wednesday, December 30, 2015

Section: 18
Hours: 4

Over the last couple weeks I've been studying other builder's blogs, reading pages and pages of Van's Airforce articles / threads and generally trying to get a handle on best practices for working with CS-3204 B-2 (Seal Pro) for sealing up the gas tanks. I've accumulated popsicle sticks, gloves,  acetone, mixing bowls, various (cheap) brushes, applicators, paper towels, ink brayers, etc. in preparation for working with  the smelly gooey mess. Today I finally dived in- yes it is stinky, gooey, and not that much fun to work with.
I started out by sealing up the mandrel holes in the end ribs with AN470-AD6 rivets. The rivets supplied with the kit were length 6 which is overkill for plugging a hole, so I cut them down to a 5 using my rivet cutter. I was able to wet set them using my C-Frame and a heavy hammer.

Next I riveted on the fuel flanges. I was going to use the squeezer, but the rivets were too close to the neck of the flanges for the squeezer to fit so I ended up using the rivet gun and bucking bar. The procedure I used was to butter the back of the fuel flange and place it on the rib (the sealant holds it in place). Then I dabbed sealant on the rivet holes and inserted the rivets. Then I buttered the shop side of the rivets before setting the rivets with the rivet gun. After setting all the rivets I went back and dabbed on more sealant for good measure.
Here's what I got done before the first batch started getting a little too stiff to easily apply. I was trying to make it look pretty, but now I'm thinking I'll be happy to settle for just making it leak free. I'll have to work faster in future build sessions. The temperature was in the mid 40's in the garage this afternoon.

Here's some of the supplies. The electronic postal scale I just purchased at Office Max died so I pulled out my trusty gram scale that I normally use for building indoor models. Sometimes old analog tech rules ;-) I'm using paper bowls for mixing- easier to mix in a bowl than a cup. I'm using acetone for clean up.


Monday, December 28, 2015

Section: 18
Hours: 3

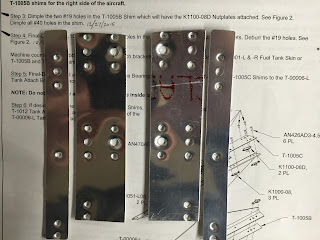
I fabricated the tank attach bracket shims (multiple times...). I found Figure 2 on page 18-04 to be somewhat confusing which caused me to assemble the wider shim the wrong direction the first time. Also, there was a discrepancy between rev.0 and rev.1 where the B and C parts were reversed, so I initially dimpled the wrong holes.

Here are the correct holes dimpled, but the angled cut at the end is wrong... I made another set after this one (see below).

Rivet these nut plates before attaching the shim to the attach bracket otherwise you won't be able to reach the rivets.

Attach the shim to the bracket after you have riveted on the K1100-08D nut plates.

Make sure you overhang the T-1008B shims in the opposite direction of the flanges as shown above and below.


Thursday, December 24, 2015

Section: 18
Hours: 3

I did final drilling, scuffing of mating surfaces and dimpling of the right tank skin.
I had to use the C-Frame to dimple many of the holes that are unreachable with the DRDT2 dimpler.

Skin with scuffed mating surfaces and all dimples applied.

At the beginning of construction, I set up my benches so I can insert either the DRDT2 or the C-Frame between the 2 tables. I added a shelf off the end of one bench that supports the DRDT2.  I add a spacer to the shelf to get the C-Frame to the proper height.
C-Frame resting between tables on the shelf and a step up spacer.

DRDT2 resting on shelf added to the end of the right table.

Wednesday, December 23, 2015

Section: 18
Hours: 4

I assembled the right tank, match drilled the j-stiffener and counter sank the holes for the tank baffle.

Slow going on these countersinks so as to not elongate the holes. They all go to a knife edge - the tank baffle acts as a backing guide for the countersink bit. Every 10th hole is left not counter sunk so the parts can be accurately clecoed together for final assembly and riveting. After the pro seal cures you go back and countersink and rivet the remaining holes.


Tuesday, December 22, 2015

Section: 18
Hours: 4

I've been busy with Xmas, skiing and programming lately, but today I put in some work on the tank. I finished counter sinking the rivet holes for the joint to the tank baffle. I also scuffed up the skin where the ribs and stiffeners will be joined to help with the pro seal bond. After scuffing, I dimpled the holes using both the DRDT2 and C-frame for the hard to reach holes.
Counter sinks go to a knife edge- I went slow and careful on these.

I taped off the areas to be scuffed and used the 3M polish pad in the air drill.

Large dimples are #8 die- be careful with deburring before dimpling to avoid cracks.

Scuffed, countersunk and dimpled left tank skin

I also filed, deburred, polished and cut to size these

Monday, December 14, 2015

Section: 18
Hours: 5

I roughed up the fay surfaces of the tank stiffeners and then deburred and dimpled the mating holes. Then I worked on the z stiffeners- filed and polished edges, final drilled and countersank holes, cut to length, deburred and riveted nut plates on.
Edge finishing the z brackets. I hold the file perpendicular to the work and start from one end and work to the opposite end. 

counter sinks for the nut plate rivets

back riveting the nut plates


finished z brackets with nut plates

I finished up by cutting the j stiffener to length and then match drilled it to the tank skin.

Saturday, December 12, 2015

Section: 18
Hours: 7

Dear Santa,

All I want for Christmas is two gas tanks with no leaks ;-)

Thank you,

Smash

Today I final drilled holes, deburred holes, dimpled holes, rechecked flanges for 90°, deburred and polished flanges, deburred the large holes in the ribs and smoothed the edges around the nose of the ribs. I think I'm done prepping the gas tank ribs for both tanks.
Tools of the trade- I really like the air die grinder with polishing wheel

I spent the rest of the day cutting and finishing skin stiffeners for the tank. The provided channel sections had holes drilled to locate the angles and edges. I taped all the channels together and cut the individual pieces to length. Then I build a couple jigs to help cut the angles accurately and quickly. After cutting on the band saw, I sanded the edges on the belt sander to final shape and then polished all the edges on the grinder with the scotch bright wheel.
I cut a simple angle guide out of a 2x4 that slides along the parallel guide. I aligned the channel piece with the rear guide hole over the blade cut in the 2x4 and then ran it through the band saw. Perfect cut every time.

Jig for cutting reverse angle- had to make jig that worked with the 90° guide, but works the same way as guide above.


Cut and edge polished parts.


Friday, December 11, 2015

Section 17
Hours: 2

I finished the last couple rows of rivets on the nose and riveted in the light bracket and j-stiffener. In the last 3 days I set 734 rivets! That's about 245 per day or approximately 1 rivet every 2 minutes. You would think you could do better, but clecoing and setup for each rivet slows the process down (not to mention drilling out the occasional bungled rivet).


The finished parts pile in the living room is getting bigger and the parts bin in the garage is shrinking. The whole process is turning small aluminum pieces into larger assemblies and hope an airplane appears somewhere down the line...

Section: 18
Hours: 4

After lunch I started work on preparing the ribs for the fuel tanks.
Stacks of ribs waiting to be prepped.

Woody making sure those flanges are really 90° to the table.

Stacks of ribs fluted and final drilled.

Thursday, December 10, 2015

Section: 17
Hours: 8

First thing this morning I tackled the hard to reach rivets at the nose. I'll admit, even starting fresh first thing in the morning I still ended up drilling a few out. It's a hard reach all the way into the nose section and its hard to buck rivets at the max curvature portion of the airfoil.


I also riveted in the access door frame, landing light mount and the j-stiffener.


It appears everything lined up nicely, but final alignment will occur when this gets attached to the spar in a couple weeks.


Heres some shots of with all the rivets in place.


After lunch I clecoed the right outboard leading edge together and riveted the ribs almost to the nose. Work went much faster after learning how to do it with the left assembly.


 By the end of the day I had put in all but the last couple rows of rivets. It gets progressively more difficult the further into the wing section you go because the curvature is greater and the reach is longer.

Chief inspector Woody advised me to knock off for the day after looking over the bottom rows of rivets. I was happy to comply- too many rivets...